 Author: Pavel Chumachenko, Software Engineer
We continue to share our experience in SugarCRM customization and today tutorial is devoted to one method out of many on how to check the correctness of a website input into the field and to make sure that it really exists.
As for our SugarCRM customization tutorial, let us define the notions “validation” and “verification”:
- Validation is the check of websites correct input
- Verification is the check of a website’s existence on the Internet
If you’re looking for the ways to implement CRM data validation without coding, you may also watch our webcast “How to Configure CRM Data Validation”.
In our case the validation of URL-addresses is available as the SugarCRM out-of-the-box functionality. In order to enable it, everything you need is just to indicate type “url” for a required field in the section variable definitions. As an example, you may have a look at the “Website” field description in the Accounts functional block:
Path:
1 | \include\SugarObjects\templates\company\vardefs.php |
Code:
1 2 3 4 5 6 7 | $dictionary['Account']['fields']['website'] = array( 'name' => 'website', 'vname' => 'LBL_WEBSITE', 'type' => 'url', 'dbType' => 'varchar', 'len' => 255, ); |
Algorithm
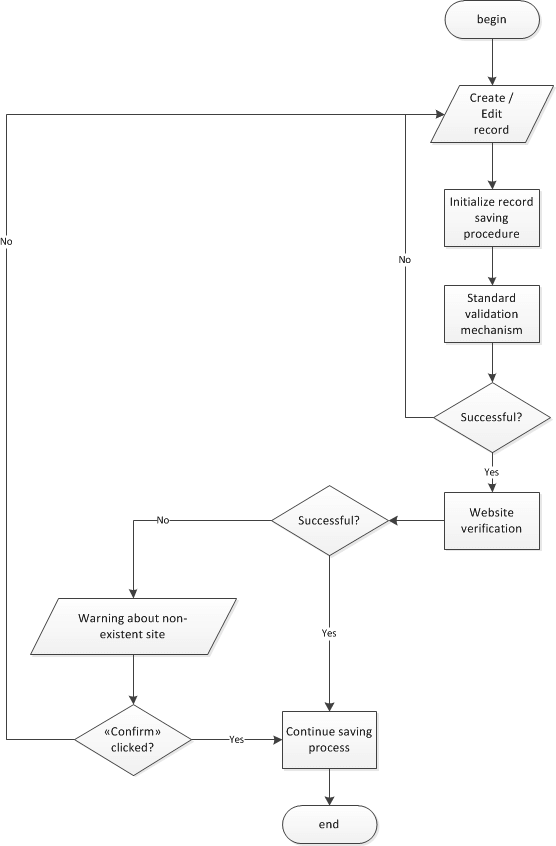
Let’s start implementing the website verification mechanism. The procedure is the following:
1. User changes a website value in creation/editing form and clicks “Save” button.
2. After clicking “Save” all form’s fields are validated.
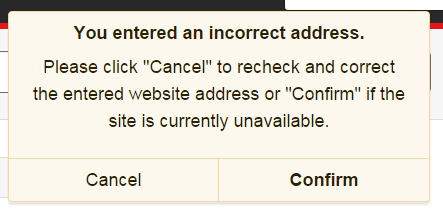
3. If the previous step is successful, we call the website verification mechanism. In case the verification is successful, we continue the process of record saving, otherwise the corresponding notification should appear with two buttons: «Сancel» and «Confirm» (pic. 1).
- a. Clicking «Сancel» the record saving is interrupted, the editing form is left on the screen.
- b. After clicking «Confirm» you can freely go on saving the record.

The algorithm is shown in chart (pic. 2)

Functionally speaking, web-site verification mechanism in SugarCRMconsists of 2 parts: a client side and a server. The client side breaks in the standard mechanism of the system’s record saving and processes the verification result and the server implements the verification mechanism itself.
Client side
On the client side we need to redefine the controllers for creating and editing forms. Each of these controllers will be extended by the same code, which is why the functionality can be developed for one and then be transferred to all the rest. As for this example (verification of «Website» field in the Accounts functional block) we are interested in the following files:
1 2 3 4 | - \custom\modules\Accounts\clients\base\views\record\record.js - \custom\modules\Accounts\clients\base\views\create\create.js - \custom\modules\Accounts\clients\base\views\create-actions\create-actions.js - \custom\modules\Accounts\clients\base\views\create-nodupecheck\create-nodupecheck.js |
If you have no such files, they have to be created. Below you will find code listing which refers to the Record controller.
Firstly, we have to “inform” the system that the mentioned controller extends the standard RecordView, and call the method of parent initializing:
1 2 3 4 5 6 7 8 9 | ({ // Extends from RecordView extendsFrom: 'RecordView', // Call parent initialize method initialize: function(options) { this._super('initialize', [options]); } }) |
Further we will redefine the evaluator of the «Save» button and will add the call of website verification mechanism.
1 2 3 4 5 6 7 8 9 10 11 12 13 14 15 16 | saveClicked: function() { this.toggleButtons(false); async.waterfall([ _.bind(this.validateModelWaterfall, this), // Implement our mechanism for verifying a website // in standard saving procedure _.bind(this.verifyWebsite, this), ], _.bind(function(error) { this.validationComplete(!error); if (error && error.status == 412 && !error.request.metadataRetry) { this.handleMetadataSyncError(error); } else if (!error && !this.disposed) { this.context.lastSaveAction = null; } }, this)); } |
And finally, we have to define what the «verifyWebsite» method is. As an argument it accepts the «callback» function, the call of which determines the general progress of saving process. In such event the call:
- callback(false) – confirms the successful completion of the current verification
- callback(true) – interrupts the saving process
1 2 3 4 5 6 7 8 9 10 11 12 13 14 15 16 17 18 19 20 21 22 23 24 25 26 27 28 29 30 31 32 33 34 35 36 37 38 39 40 41 42 43 | verifyWebsite: function (callback) { // Creating URL for calling verification mechanism // in the server side var url = app.api.buildURL('', 'UrlValidationApi'), // Website value, that should be verified post_data = {url: this.model.get('website')}; // We don’t need to verify website if it is empty if(!_.isEmpty(post_data['url'])){ // Call verification mechanism app.api.call('create', url, post_data, { success: _.bind(function (data) { // Property "status" equal "success", if script ____________________// worked without errors if (data.status === 'success') { // Verification is successful if (data.isValid) { // Continue saving callback(false); } else { // Alert if website does not exist app.alert.show('invalid-website-message', { level: 'confirmation', title: 'NTC_INVALID_WEBSITE_TITLE', messages: 'NTC_INVALID_WEBSITE_MESSAGE', onCancel: function () { // Returns user to edit form callback(true); }, onConfirm: function () { // Continue saving callback(false); } }); } } }, this) }); } else{ // Continue saving, if website is empty callback(false); } } |
Server side
The implementation of the server side of website verification mechanism means writing API. Let’s call the file of the API «UrlValidationApi.php». It should be placed in the directory
1 | \custom\clients\base\api\ |
if we want to call this function from other functional blocks as well, or in directory
1 | \custom\modules\Accounts\clients\base\api\ |
if API is determined only for the Accounts module.
The class that describes the function is inherited from the standard SugarApi class and consists of 3 methods:
1. registerApiRest() – method that registers the API-function.
2. runUrlValidation($api, $args) – the method that realizes the basic API logic; it is the method that is called when accessing API from the clients side. Here:
- a. $api – instance of RestService object
- b. $args – parameters which we united in post_data variable on the client side
3. urlIsOk($url) – method which actually verifies the site’s address. As the argument it takes the line containing URL that was entered in the Account form in field «Website».
It should be mentioned that for the system’s correct work compulsory are only registerApiRest and runUrlValidation methods.
1 2 3 4 5 6 7 8 9 10 11 12 13 14 15 16 17 18 19 20 21 22 23 24 25 26 27 28 29 30 31 32 33 34 35 | require_once 'include/api/SugarApi.php'; class UrlValidationApi extends SugarApi { // Register API public function registerApiRest() { return array( 'urlValidation' => array( 'reqType' => 'POST', // Route we use to create API URL on the client side 'path' => array('UrlValidationApi'), 'pathVars' => array(''), // Method that is called when calling API 'method' => 'runUrlValidation', // Description 'shortHelp' => 'Validate Url', 'longHelp' => '', ) ); } public function runUrlValidation($api, $args) { // Get website value that comes from the form $url = $args['url']; return [ // Checking is successful 'status' => 'success', // Get verifying result 'isValid' => $this->urlIsOk($url), ]; } } |
As the next step let’s examine the implementation of the verification mechanism. At the first stage we check if the website address being verified starts as «http://» or «https://». Under the standard, the field of «url» type works as follows: when filling it in the user may not indicate the protocol of data transmission, it will be automatically populated when focus is lost. But if you fill in, for instance, «example.com» and click «Save», prefix «http://» will not be written at the beginning. That’s why, the first the first thing we should do is to correct it.
Next, with the help of standard PHP filter_var function we check whether our URL is valid, i.e. written correctly. The third and the last step we configure and send the request to the address being verified with the help of cURL. Below is the description of every cURLа option:
- CURLOPT_URL – loadable URL
- CURLOPT_USERAGENT – contents of the headline “User-Agent: “, sent in HTTP-request. In this case we design the request as if it comes from a browser. It will give us an opportunity to get round some restrictions of the websites (e.g., they can block requests without headers)
- CURLOPT_RETURNTRANSFER – return the transmission result as the line from curl_exec() instead of direct output into browser
- CURLOPT_VERBOSE – responsible for output of additional information
- CURLOPT_TIMEOUT – defines the maximum number of seconds for performing cURL-functions
- CURLOPT_SSL_VERIFYPEER – used for prevent cURL from checking the nod certificate
- CURLOPT_SSL_VERIFYHOST – check of general name existence in SSL certificate
Now we only have to make cURL request with the help of curl_exec and to get HTTP respond code. If the received value is in the range of [200..400], then the URL being verified really exists.
1 2 3 4 5 6 7 8 9 10 11 12 13 14 15 16 17 18 19 20 21 22 23 24 25 26 27 | private function urlIsOk($url) { if ((strpos($url, "http://") === false) && (strpos($url, "https://") === false)) { $url = "http://" . $url; } if (!filter_var($url, FILTER_VALIDATE_URL)) { return false; } $agent = "Mozilla/4.0 (compatible; MSIE 5.01; Windows NT 5.0)"; $ch = curl_init(); curl_setopt($ch, CURLOPT_URL, $url); curl_setopt($ch, CURLOPT_USERAGENT, $agent); curl_setopt($ch, CURLOPT_RETURNTRANSFER, 1); curl_setopt($ch, CURLOPT_VERBOSE, false); curl_setopt($ch, CURLOPT_TIMEOUT, 5); curl_setopt($ch, CURLOPT_SSL_VERIFYPEER, FALSE); curl_setopt($ch, CURLOPT_SSLVERSION, 3); curl_setopt($ch, CURLOPT_SSL_VERIFYHOST, FALSE); $page = curl_exec($ch); $httpcode = curl_getinfo($ch, CURLINFO_HTTP_CODE); curl_close($ch); if ($httpcode >= 200 && $httpcode < 400) return true; return false; } |
Conclusions
The tutorial describes one of the options how to customize SugarCRM for website verification. The advantage of this method is its simplicity. If necessary, it can be extended for verification of email addresses (domain sides). Also one should always remember that in any case verification is a time consuming process, and even if we received code 200, it doesn’t mean that the website doesn’t use redirection via javascript.
If you need our advice on SugarCRM customization, don’t hesitate to contact us.
Other SugarCRM customization tutorials: