 Author: Anastasiia Gubanovych, CRM Consultant
In this tutorial, we are going to consider an example of how to create an event in Timeline Viewer using Logic Builder.
For practising this tutorial, you need:
• Sugar instance with installed Timeline Viewer and LB Templates
• Access to Logic Builder https://logicbuilder.integroscrm.com/
Let’s dive into resolving the following task – we want to register a held call in Timeline. To be more precise – we want to see made outbound and received inbound calls to Accounts, Contacts, Cases, and Leads:

Step 1: Create Timeline Events in Sugar
Navigate to Timeline Events module and from the menu select Create Timeline Event:
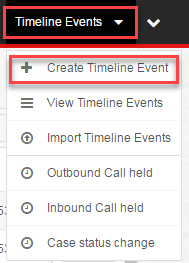
Enter data on new Timeline event:
- Name – this is the name of the event, so it should sound like ‘Outbound Call Held’
- For Icon find and upload a nice-looking picture, which suits the best this event
- First Target Module – let it be Accounts
- For Lifetime Units leave Years and Lifetime Duration – 1. Which means that all events, registered in the account will be deleted after a year. Sure, you can change these values to those which suit you best.

Save the record. Repeat steps – create new Timeline Events records for the next events:
- ‘Inbound Call Held’ for target module Accounts
- ‘Outbound Call Held’ for target module Contacts
- ‘Inbound Call Held’ for target module Contacts
- ‘Outbound Call Held’ for target module Leads
- ‘Inbound Call Held’ for target module Leads
- ‘Outbound Call Held’ for target module Cases
- ‘Inbound Call Held’ for target module Cases
Note: Surely, you do not need to create an event if you do not want to log some type of calls for some entities:)
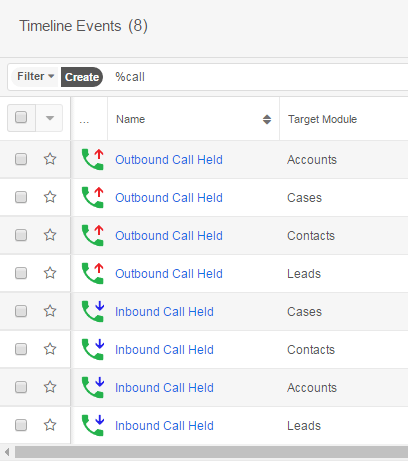
As a result, you should have eight events – an event for an outbound call, an event for an inbound call for four modules:
Step 2: Create template
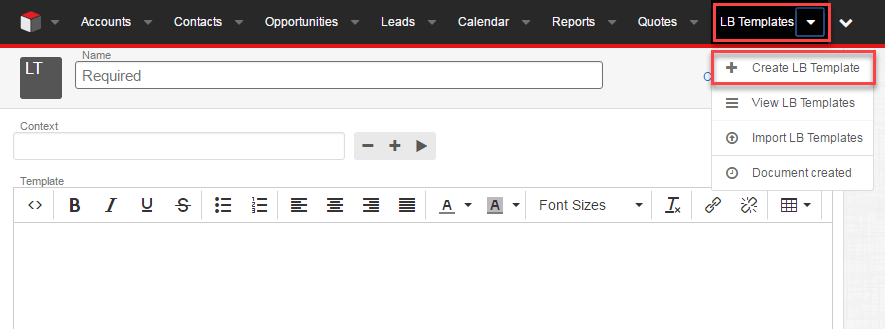
We want to create a fancy message for users. LB Templates module helps us in that. Navigate to LB Templates module and create a new record:
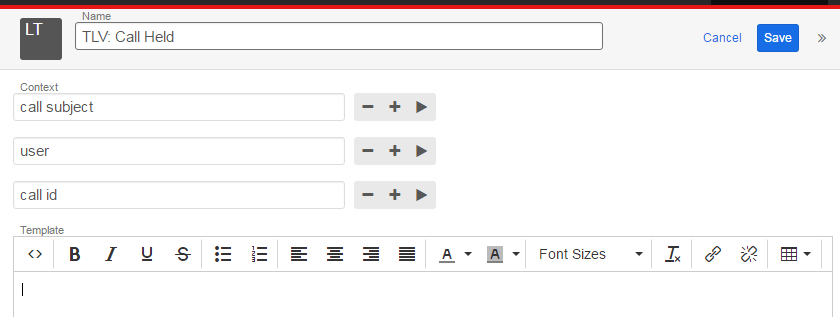
Fill template name – like ‘TLV: Call Held’. Then think about the message that users will see on the Timeline. It may sound like: Call ‘call subject’ held by U: ‘username’ (‘U’ is an abbreviation for User). Also let be ‘held’ in green. We have two variables here – call subject and user – which will be filled in when generating the event. Let’s make call subject as a link to a Call Record. For making a link we need one more variable – call Id. Define these variables in the context section:
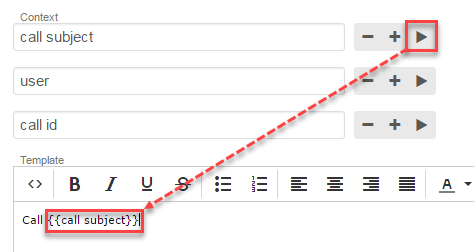
In Template section, start composing the message: add text Call and after space add variable Call subject using play button near it:
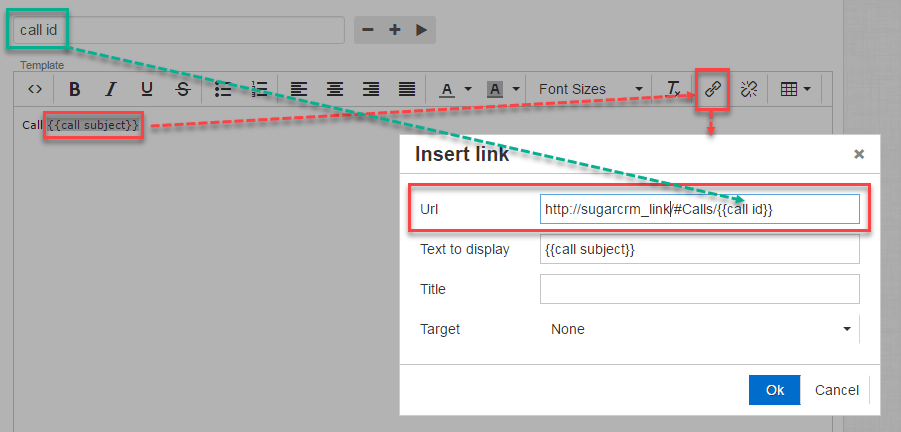
Next, make a link from Call subject – highlight all text {{call subject}}, click on Insert/edit link. In URL section type the link to your Sugar instance, then add the reference to Call module and finally type the variable for call id (if you are not sure how to make a link – open any Сall record in Sugar, copy-paste the link from the browser to Url section, and change Call ID to variable {{call id}}):
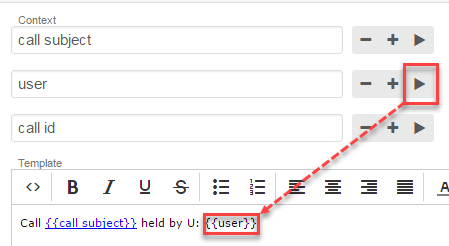
Click ‘Ok’ when it’s completed. Finish the message by adding the remaining text:
To add color to the text, we need to add tags directly in HTML. Click on ‘Source Code’ in an editor and in ‘Source Code’ section add HTML tags for color:

Also, let’s make ‘held’ in bold:

Save the template.
Step 3: Build a flowchart for event generation
Spoiler: you do not have to create a flowchart for each event in this case. We will handle all these events in one flowchart.
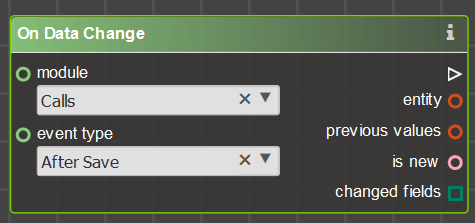
After logging in and importing metadata from Sugar, where we’ve just created events and a template, select a start operator. We are going to create the event when Call changes its status to ‘Held’, so our element will be On Data Change, in which the module is Call and an event type is After Save.
Define input conditions
Next, we need to filter out calls, as we do not need to record an event for each call. We have the condition here that our Call status was changed to ‘Held’. We can make this condition by combining two comparisons – current Call Status is ‘Held’ and current Call Status is not equal to the previous one:
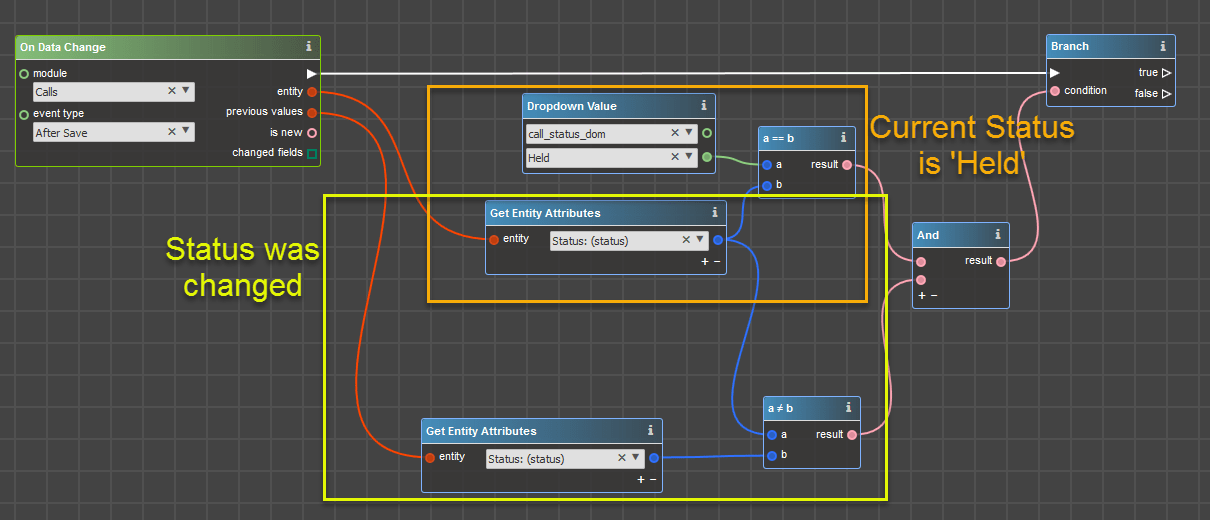
Create custom context
Note: In this part, we are going to create custom preview information for the event. It is not a necessary part, and you can skip it and proceed to Create Timeline record.
To help in deciding whether you need custom context or not, below there are several examples how the events will be displayed in Sugar with custom context and without it.
Custom context will show the information, defined in the flowchart, when a user clicks on Preview button near the event. Below there is the screenshot of how Preview looks like, when built in a flowchart (actually, what we are going to do in this part of the tutorial)
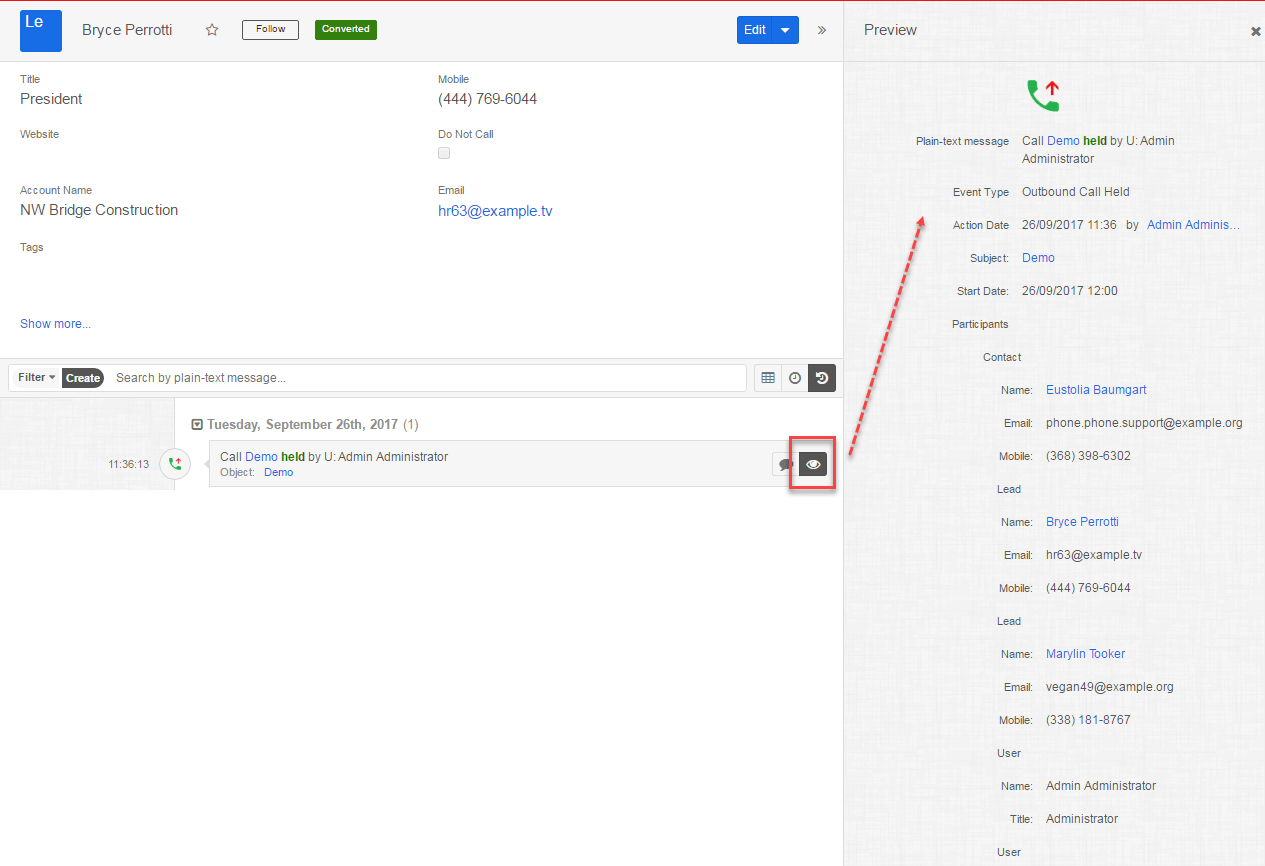
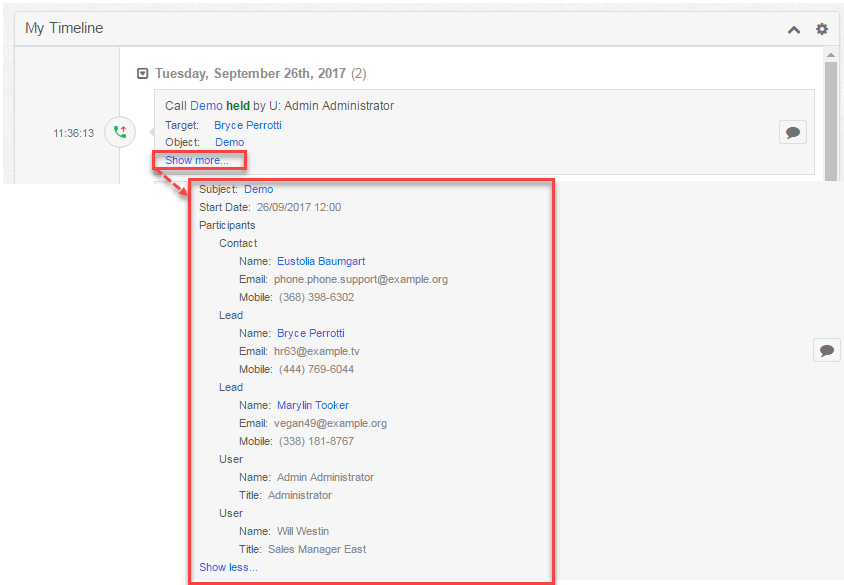
If there is the custom context for the event, on dashlets users will be able to click Show More… to expand additional information:
Otherwise, if you leave the context empty, on Preview button users will see system default preview of Object module – in our case, it is default Call Preview:
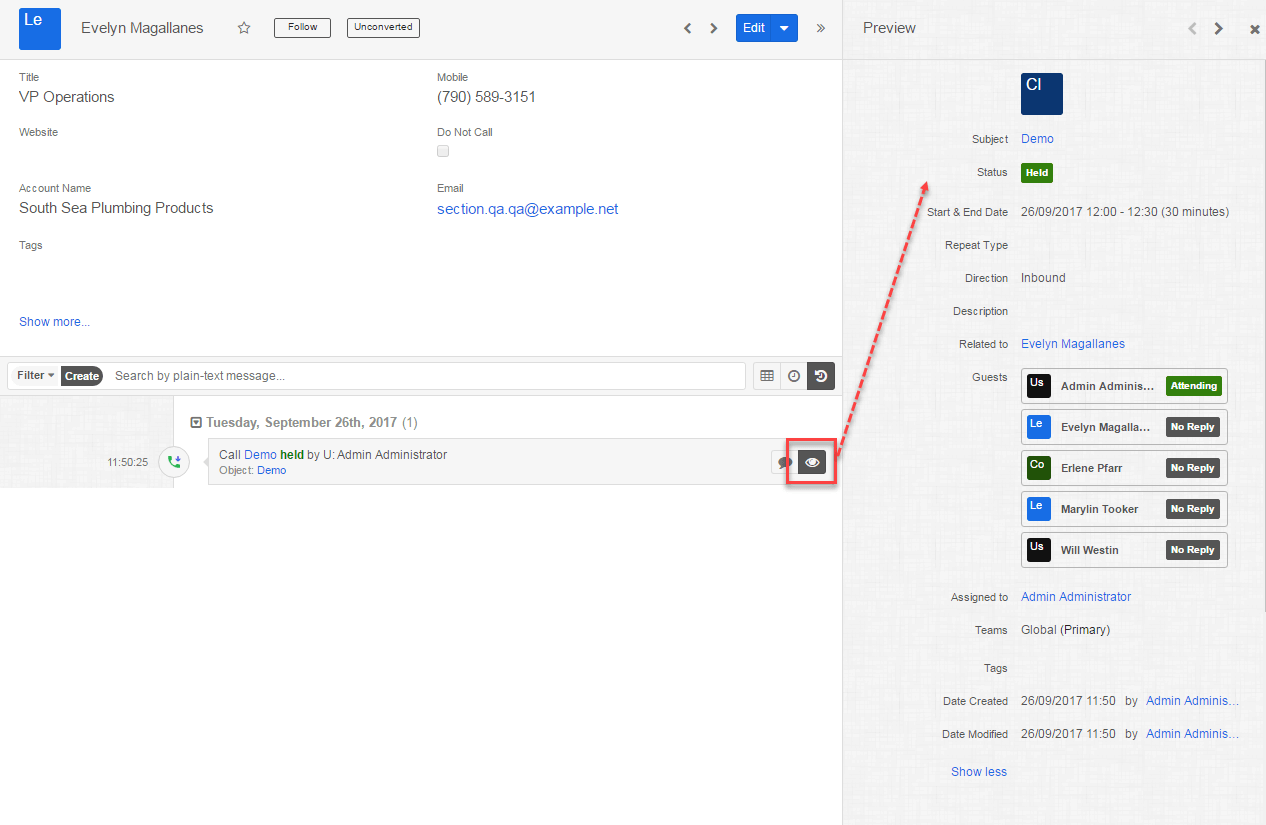
Dashlet won’t display any detailed information on the event:

Hope this helps to make the decision of building the context or leaving the standard one.
If you decide to make a custom one – proceed with reading this part. Otherwise – move to part Create Timeline record
We want to see a quick preview of the event with information about Call – Subject, Start date, who made the call, Description and all call Participants, who can be Leads, Contacts or Users.
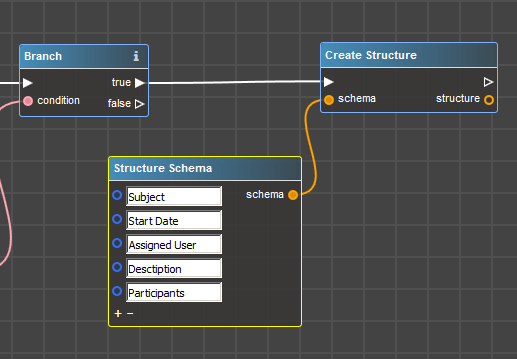
For generation custom context we need to create the structure. As a schema for the structure, we need to define fields, which will be displayed on Preview: Subject, Start Date, User, and Participants:
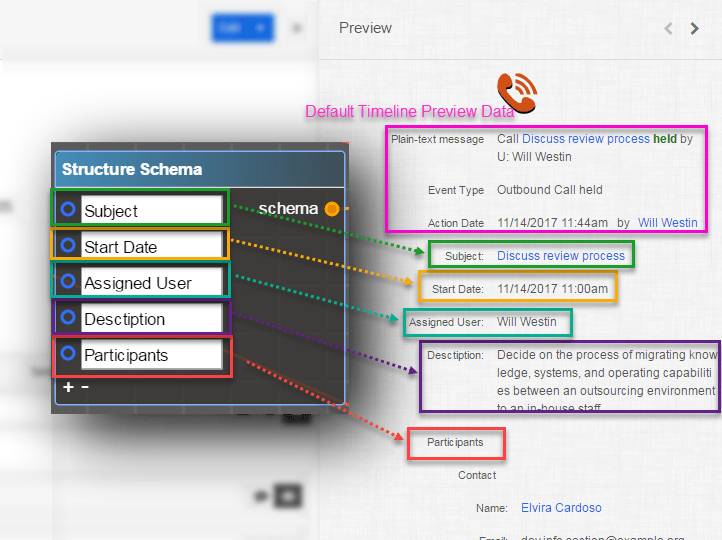
Once the flowchart is finished and deployed, the current structure will look like this on Preview:
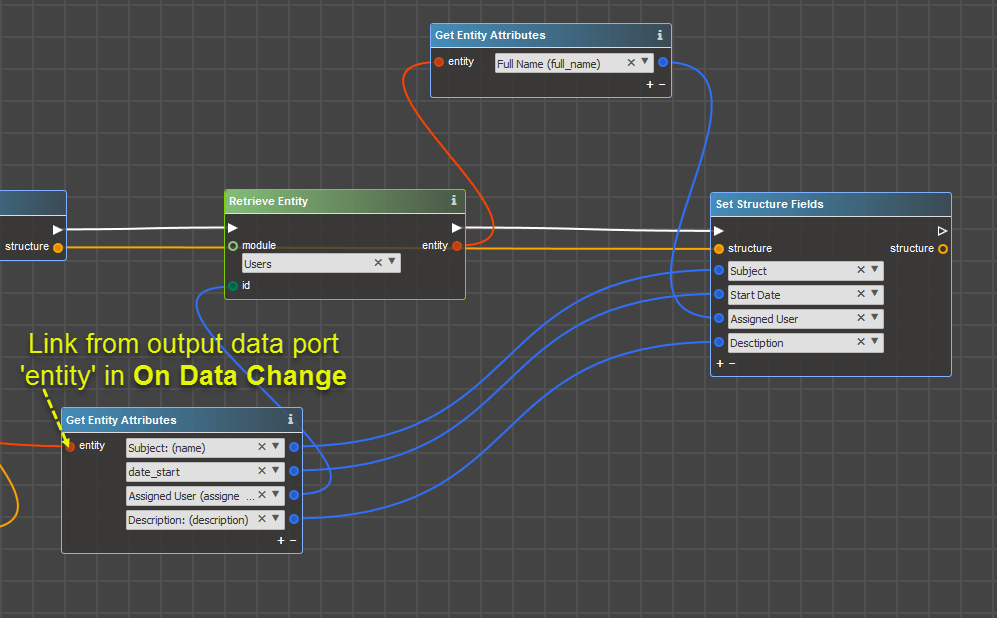
Next put information in these fields – we can get Subject, Start Date and Description directly from Call entity. For receiving the Assigned user, we need to get entity ‘Users’ and get Full Name from that Users entity – that’s why we add operator Retrieve Entity in the control flow. For setting values in the structure, operator Set Structure Fields is used.
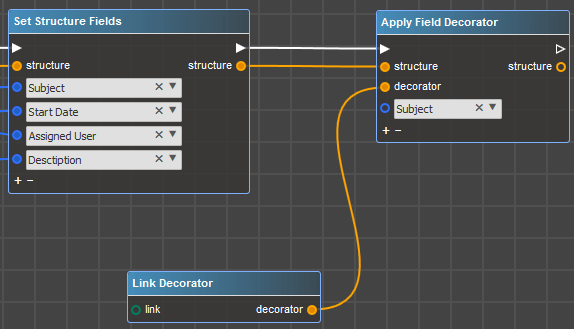
If we leave it as is, all information will be shown as a text. We want ‘Subject’ to be a link to Call record, so we need to apply a link decorator for this structure field. Add Apply Field Decorator operator, by which we can add formatting to the field.
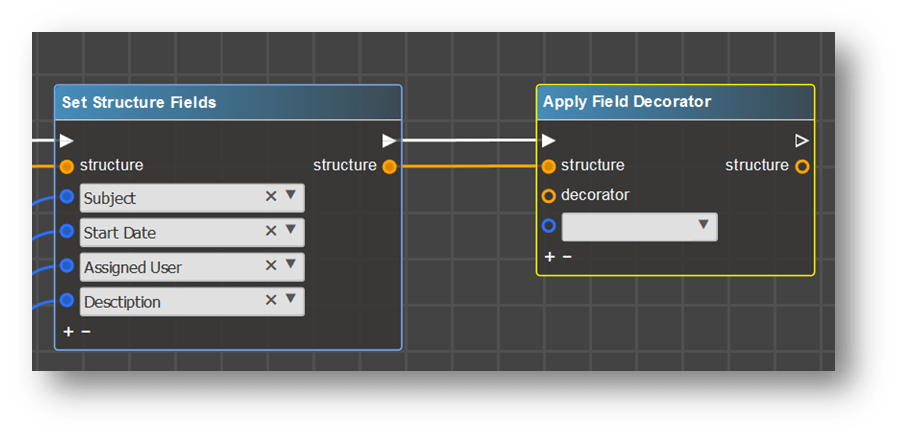
As mentioned above, we want ‘Subject’ field to be the link to Call record. In Apply Field Decorator select field, to which we are going to apply formatting – Subject, and add Link Decorator operator:
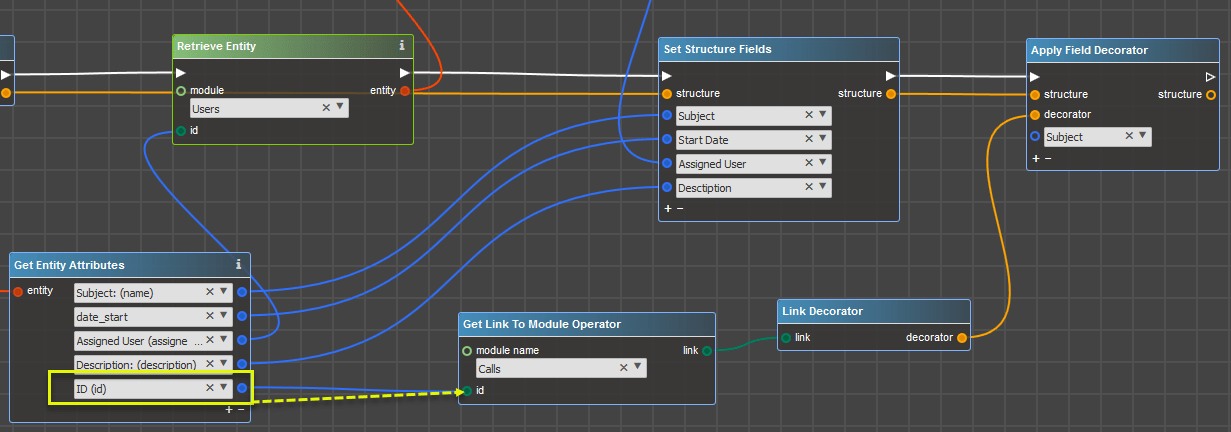
This operator requires inputting additional information on the link, which we can get from operator Get Link To Module Operator, in which in turn select module, to which the link refers (Calls module) and specify a record ID:
One field is still empty – it is information about Participants. There are three types of participants – Contacts, Leads and Users, which may be added to the Call. That is why to show all participants we need to go through all guests related to the call.
We need to accumulate all different participants and store them somewhere. For this, we will use a collection, so put operator Create Collection. So far we have nothing to add to the collection, so leave input port ‘element’ empty.
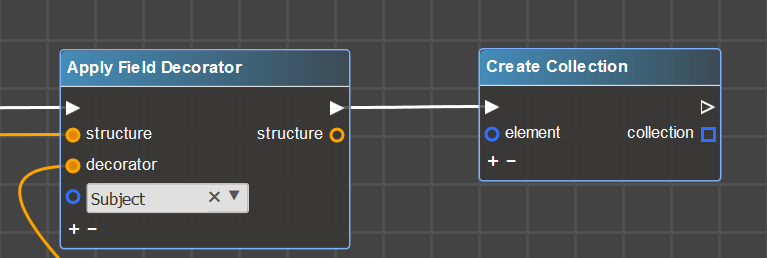
Now we need to fill our collection. Let’s recall why we do this – we need to output all guests, related to the Call, which may be Contacts, Leads and Users.
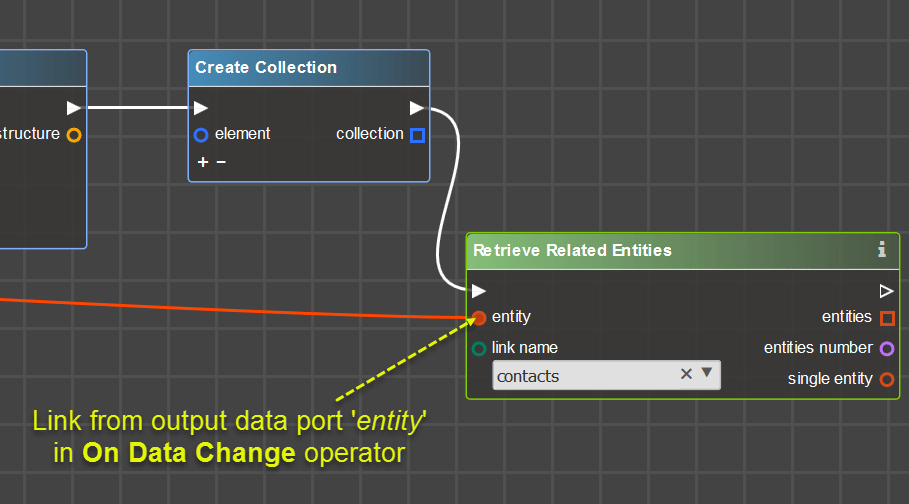
Consequently, to receive Contacts related to Call – use Retrieve Related Entities, using ‘contacts’ in the link name.
To gather information from each Contact use For Each Entity operator:

From Contact, we show a contacts’ Name, Email Address and Phone Number into Preview. Here we have some kind of the embedded context, so again we need to create a structure with the schema: Name, Email, Mobile:
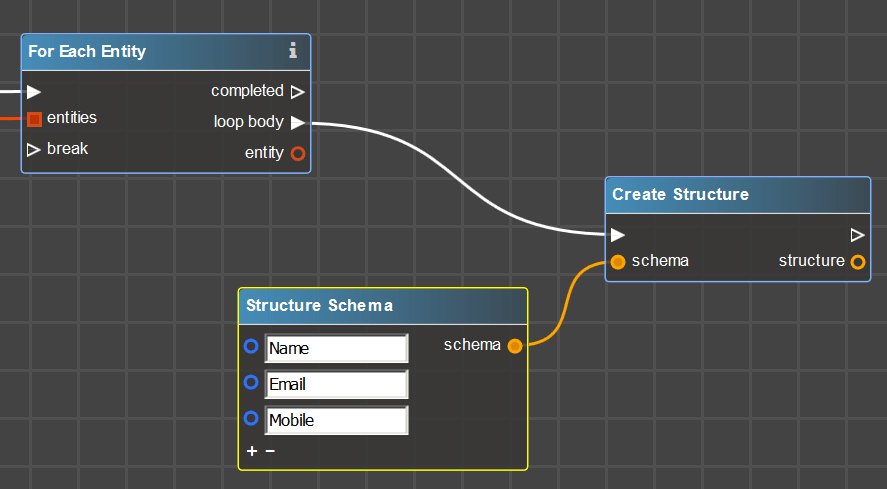
Then fill the structure with data from contact – name with Contact Name, Email with Contact Email and so on. We get Contact entity from For Each Entity operator:
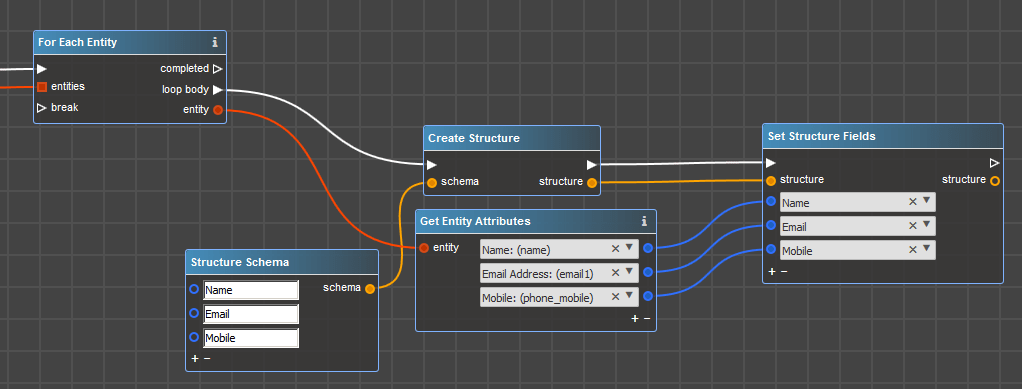
Also, we want the Name to be not just a simple text, but the link to Contacts’ entity. In the same way, as we made the link to Call earlier, here we need to add link decorator to ‘Name’ field:

If we just add current element to the collection, as a result users will see all details like name, email, mobile, name, email, mobile which is not user-friendly enough:
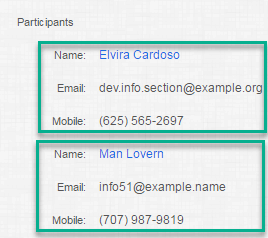
Let’s add some description – like ‘Contact’ text before details:
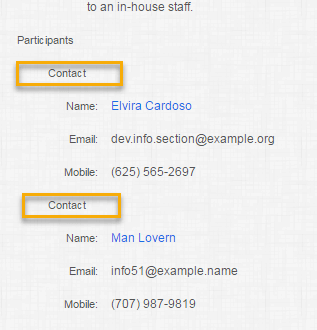
For this, we create one more structure with only one field Contact, where we input results of our previous structure:
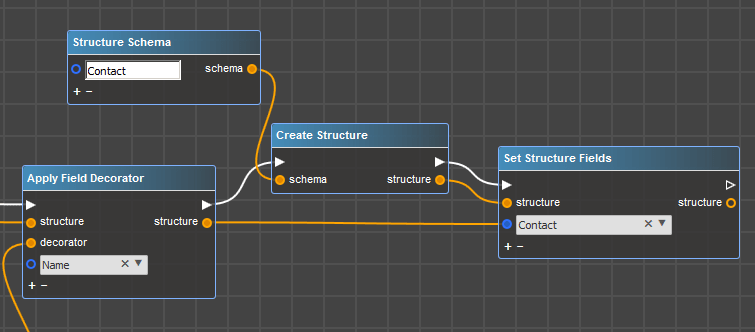
Now we can add the current structure to our earlier formed collection:
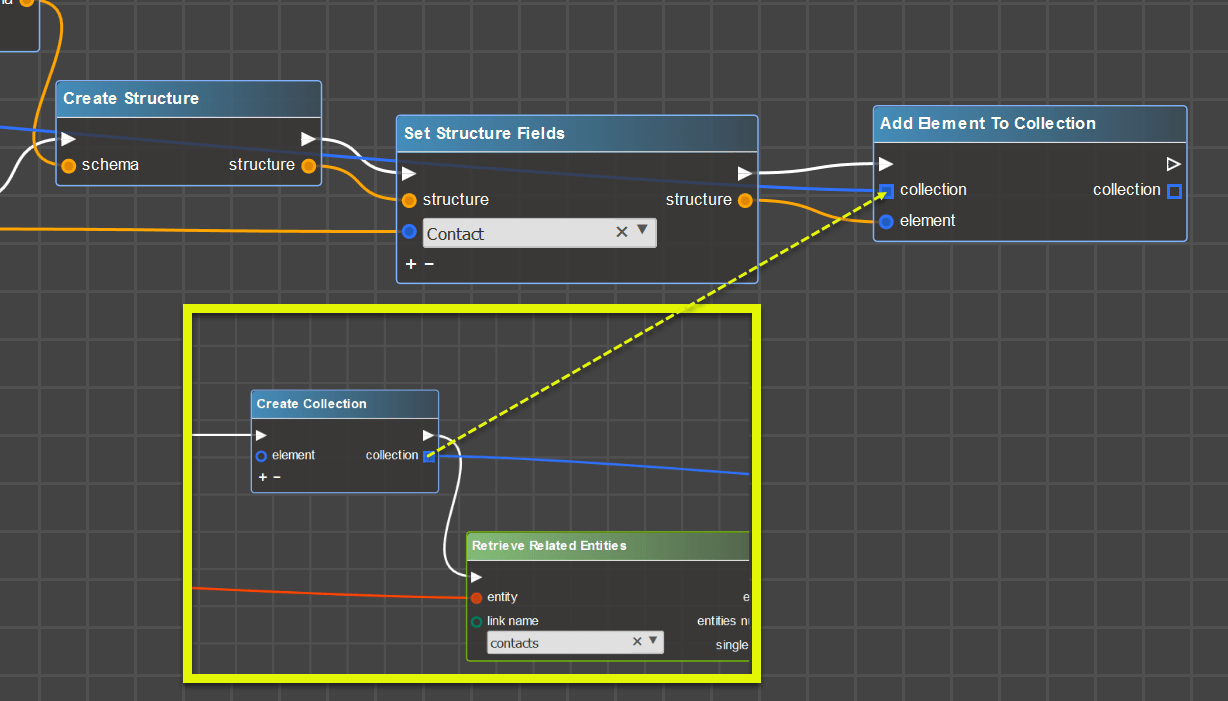
Next data that we need to collect is Leads, that are guests of the call. Algorithm for receiving Leads are quite the same as for Contacts with the only difference that now we are working with Leads entity. Let’s quickly go through the steps for gathering Leads information.
Return to operator For Each Entity, where we have worked with Contacts, and retrieve Leads related to Call entity via the link called ‘leads’:
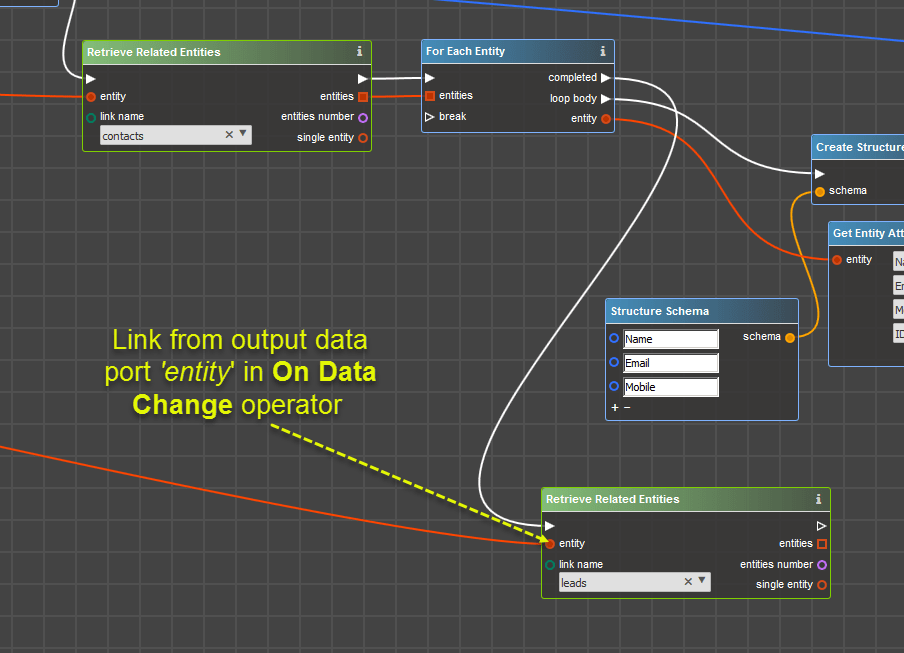
Build a loop, where create the structure from Lead Name, Email and Mobile:
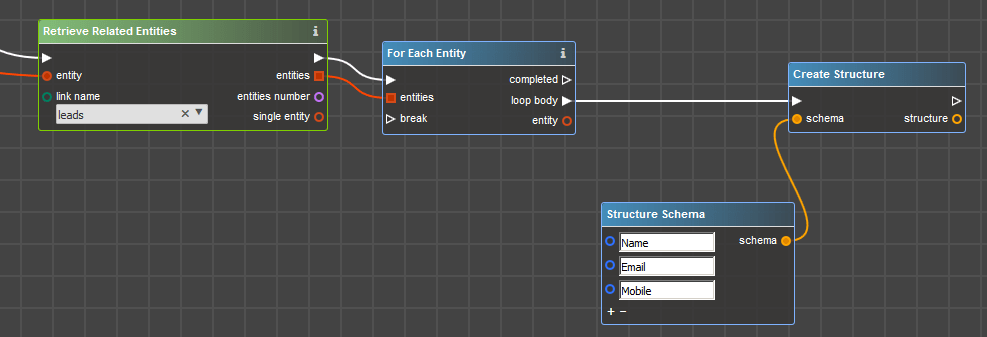
Put data into the structure from Lead entity:
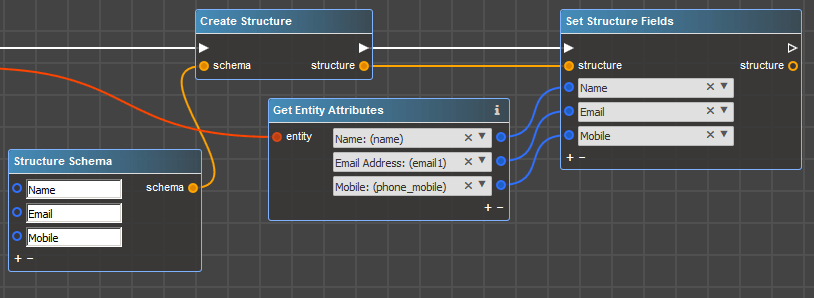
Make Name as the link to Lead record:
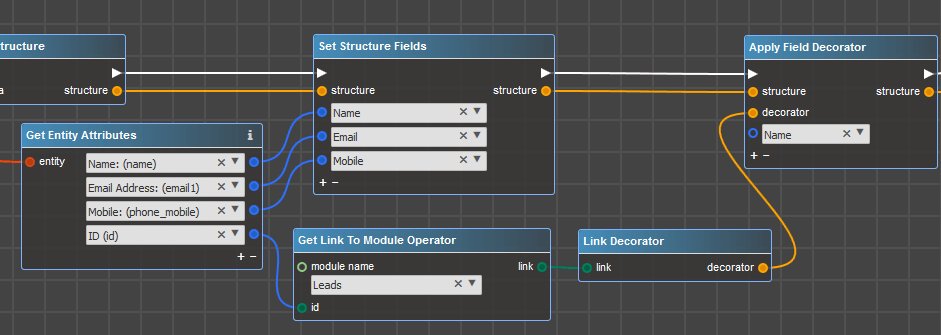
Create structure to add user-friendly output with ‘Lead’ schema:
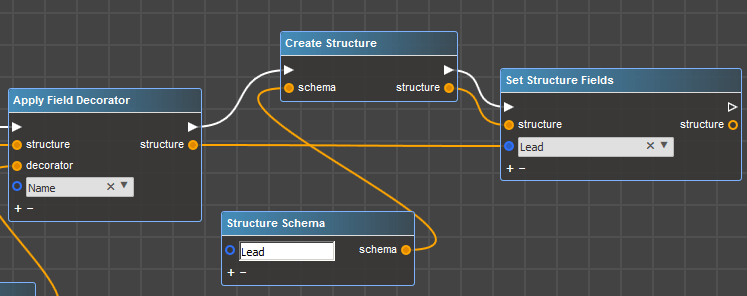
Finally, add formed Lead information into the collection for gathering participants:
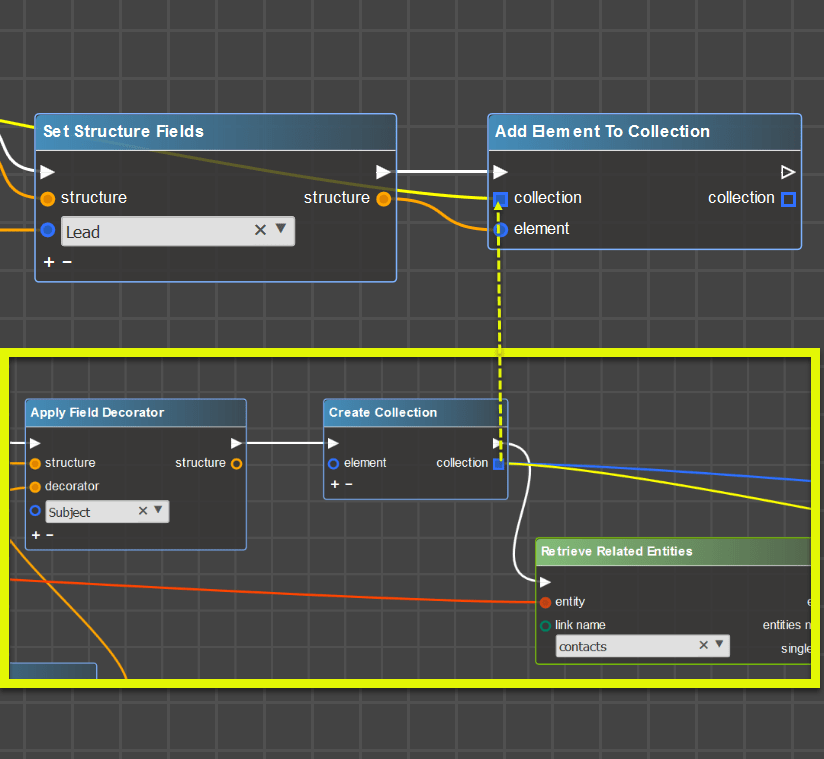
And we still have Users as call participants, so the same steps need to be performed to collect Users information. Control flow continues from ‘Completed’ output port from the Leads loop. Firstly retrieve Users related to call, using ‘users’ link:

Create the structure for user output (we will output Name and Title):
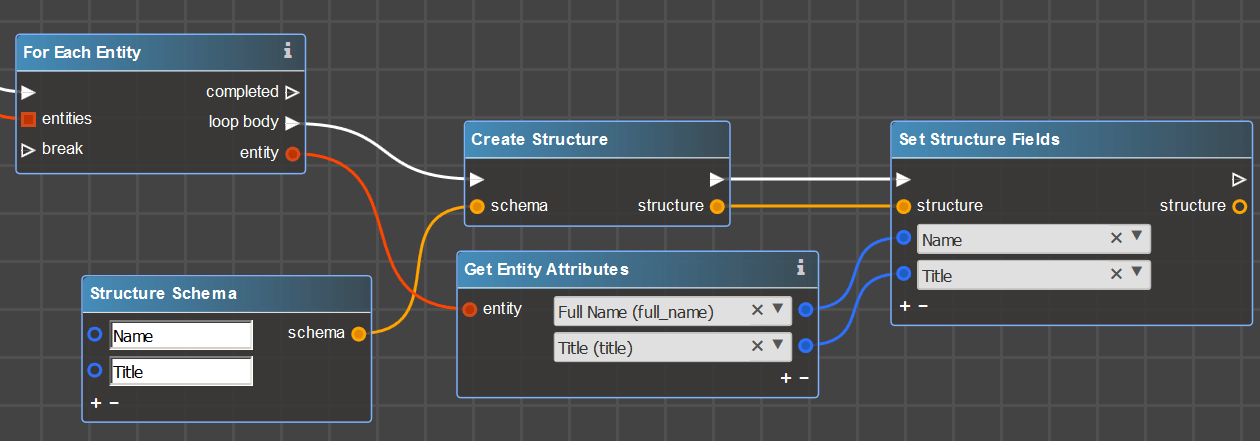
We do not need the link to the employee record here, but if you need – add it as we did before for Contacts and Leads. So add Users header to structured output and add users’ data into collection:
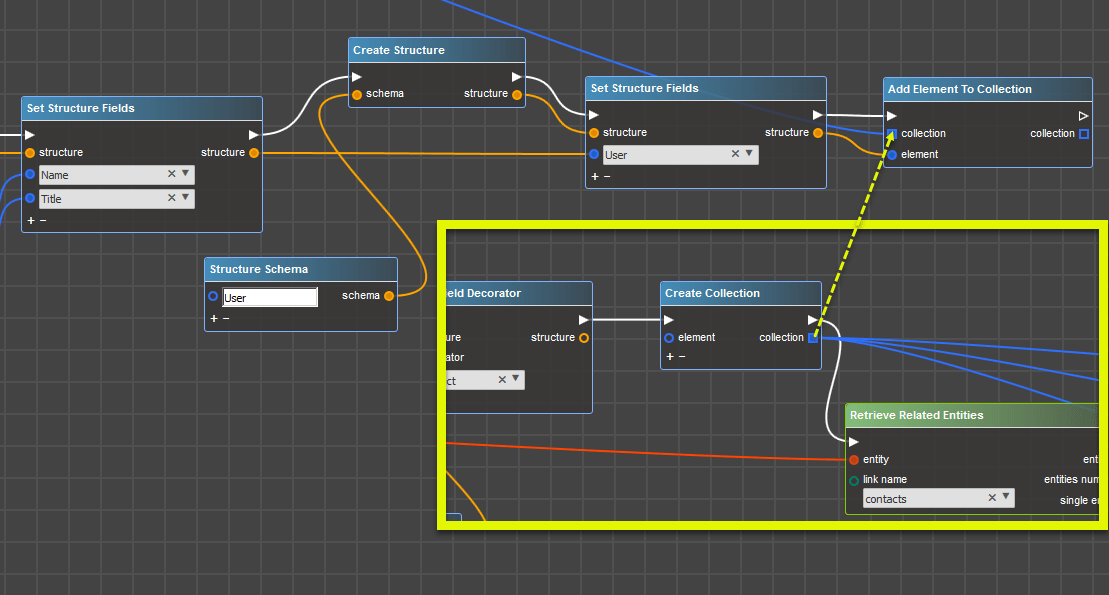
Finally, the collection stores all call participants, so set data which stored in collection to participants structure field. Control flow will go from the last completed output, where we collected Users.

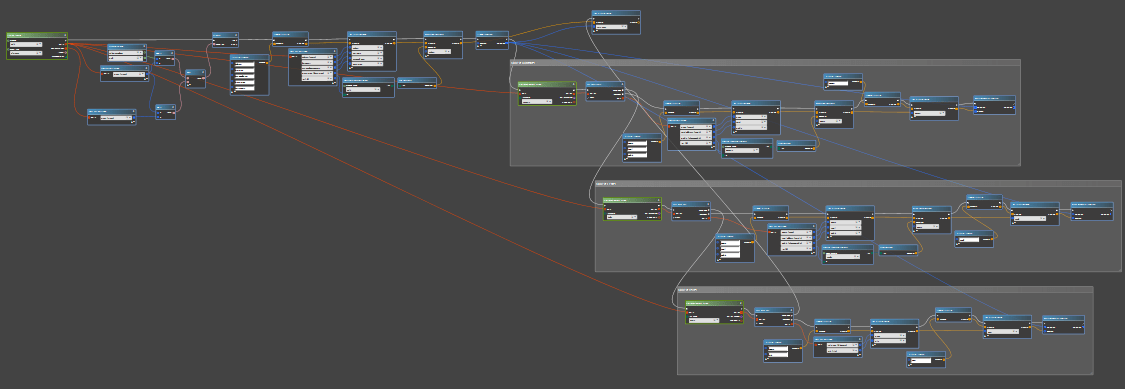
For better convenience and readability I’ve added comments and will continue building the flowchart from the point where we started collecting participants, and I’ll place the part of the schema which is responsible for the collecting the participants below.
If we zoom out – at this point the flowchart looks like this:
Create Timeline record
Do you remember I told that there is no need to build a flowchart for each event? For this, we need to know the direction of our call – whether it is outbound or inbound. Depending on the direction, we will receive Timeline Event entity to create the event.
Define the variable, which will store direction of the call.
Note: it is a good practice to set empty value for variable if it is the first variable declaration

Next, we need to recall how we named our events (Outbound Call Held and Inbound Call Held). These are values which we need to set in the variable depending on the Call direction. When we have Inbound call – we will set an event type ‘Inbound Call Held’ for an event, for outbound – ‘Outbound Call Held’:
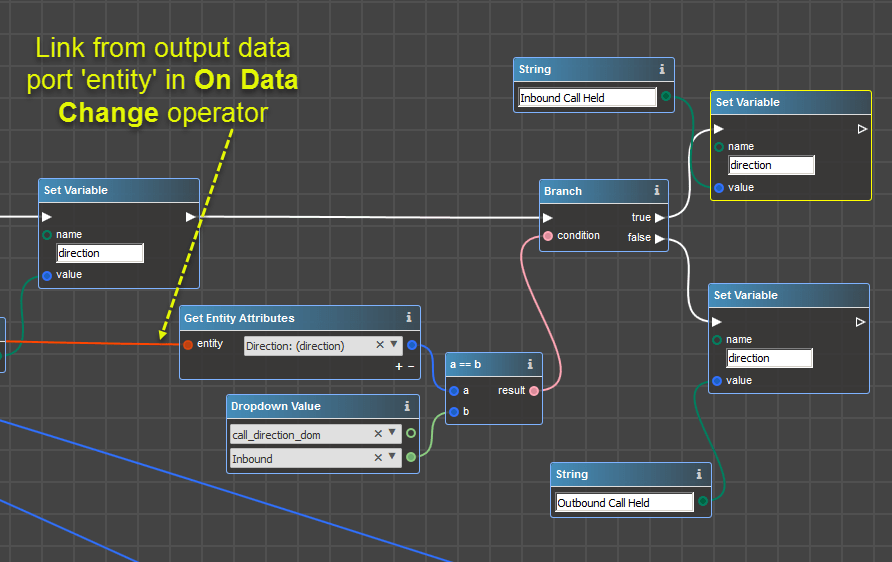
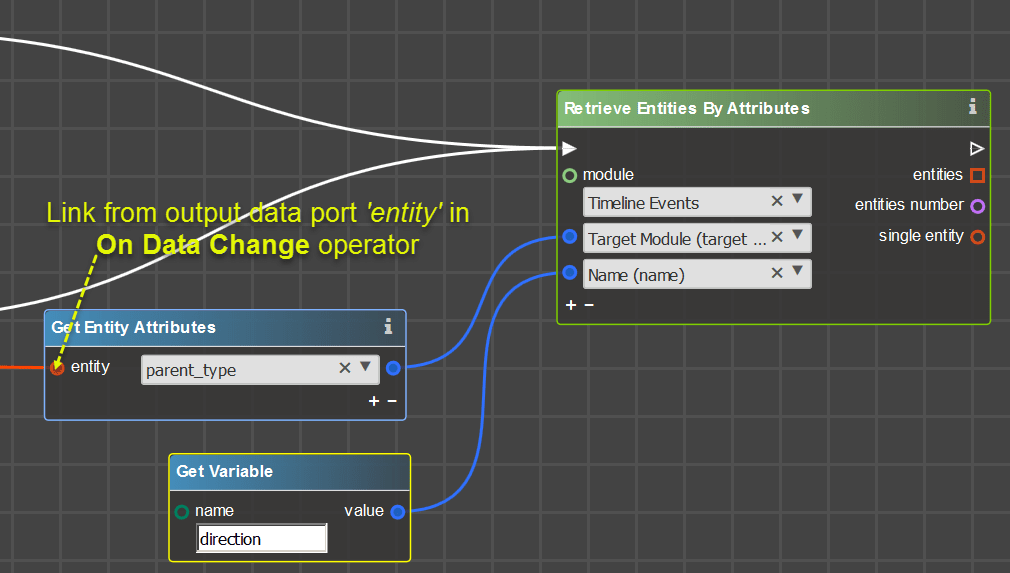
Before creating a timeline record – we need to receive Timeline Event. We will do this using Timeline Event Name (that’s why we set variable recently) and target module (Lead, Account, etc.), which is the same as parent type in call. To retrieve entity use Retrieve Entity By Attributes operator. The module that we are looking for is Timeline Events:
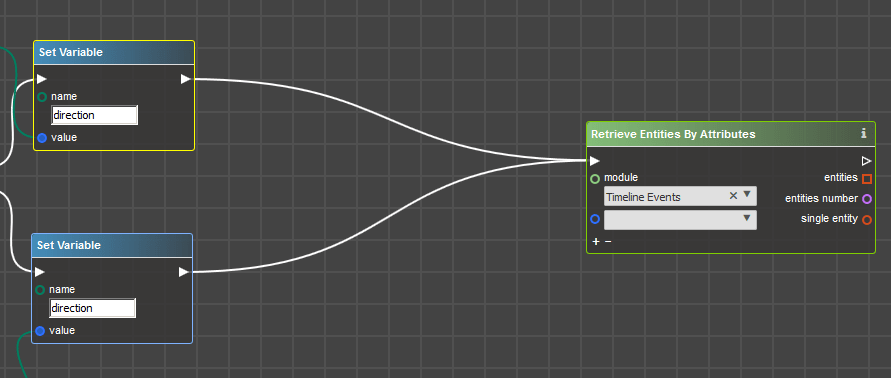
Attributes by which we receive records are: Name, which equals to value in variable ‘direction’ and Target module, which equals to Call parent type:
Finally, we gathered almost all information – it’s time to create a new timeline event. Put Create Entity operator and select timeline from module list. Also, put Set Entity Attributes to set values into timeline fields:

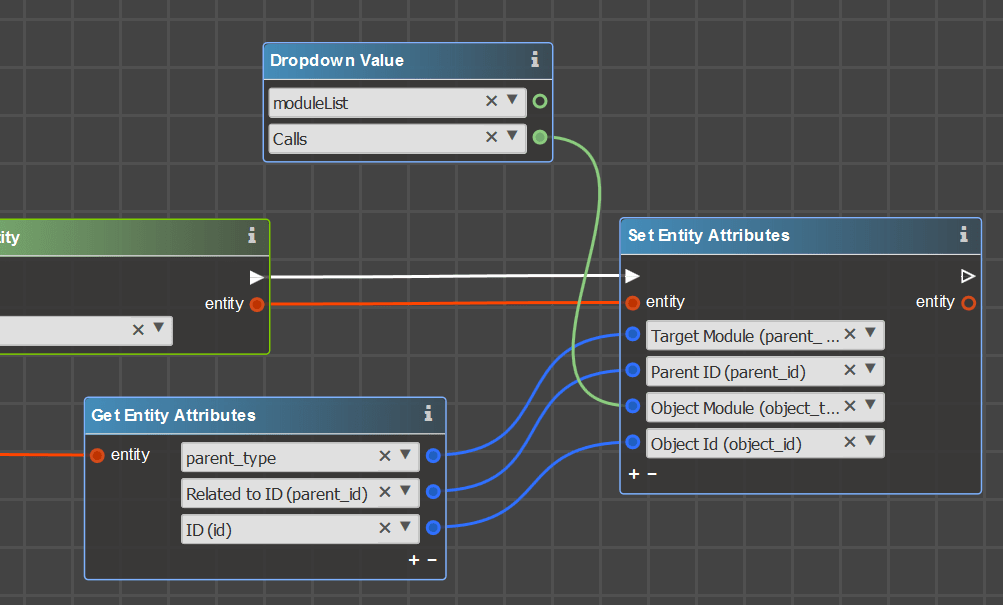
First, define Target Module and Parent ID. Target Module will be the same as parent type for the Call, and Parent ID will be the same as Related to ID from Call. Retrieve Call entity and get attribute data:

Then select an Object Module and Object Id. Object module is Calls, Object Id is ID of the current Call:
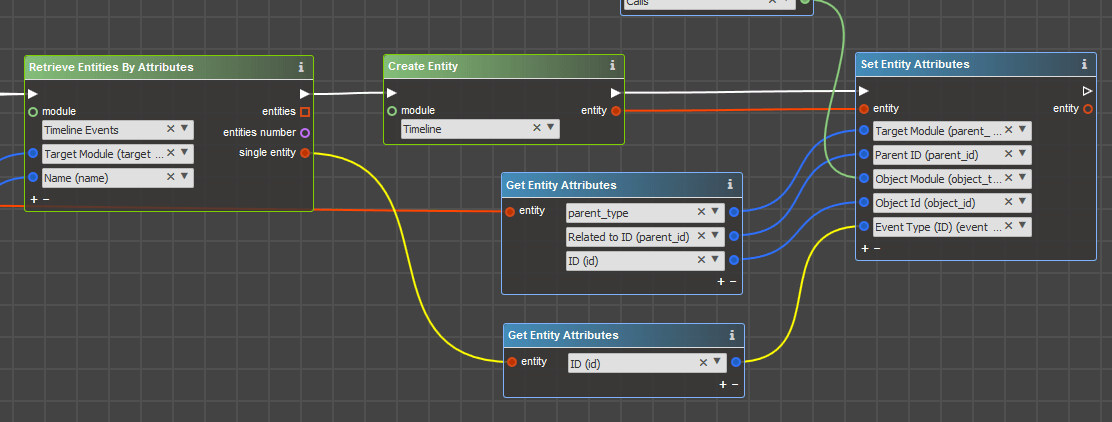
Next, we need to set Timeline event, to which current event will be related to. For this – retrieve ID from Timeline Event entity that we found before:
Fill Context – it is what the user will see on Preview. Here put the structure, where we defined all call details:

If you skipped the part with context composing – do not chose this field at all.
Last but not least – fill message in Rich-text message field. Earlier we created a template ‘TLV: Call Held’, so we will use this template. Put Get HTML Text From Template operator and select ‘TLV: Call Held’ from templates:
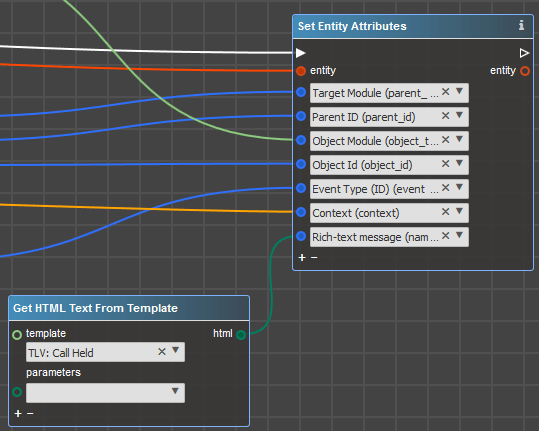
Next select the parameters, which we defined in Sugar and fill them with data from Call entity.
We want to output Assigned user in the message, so we need to add operator Retrieve Entity before Set Entity Attributes for the Timeline.
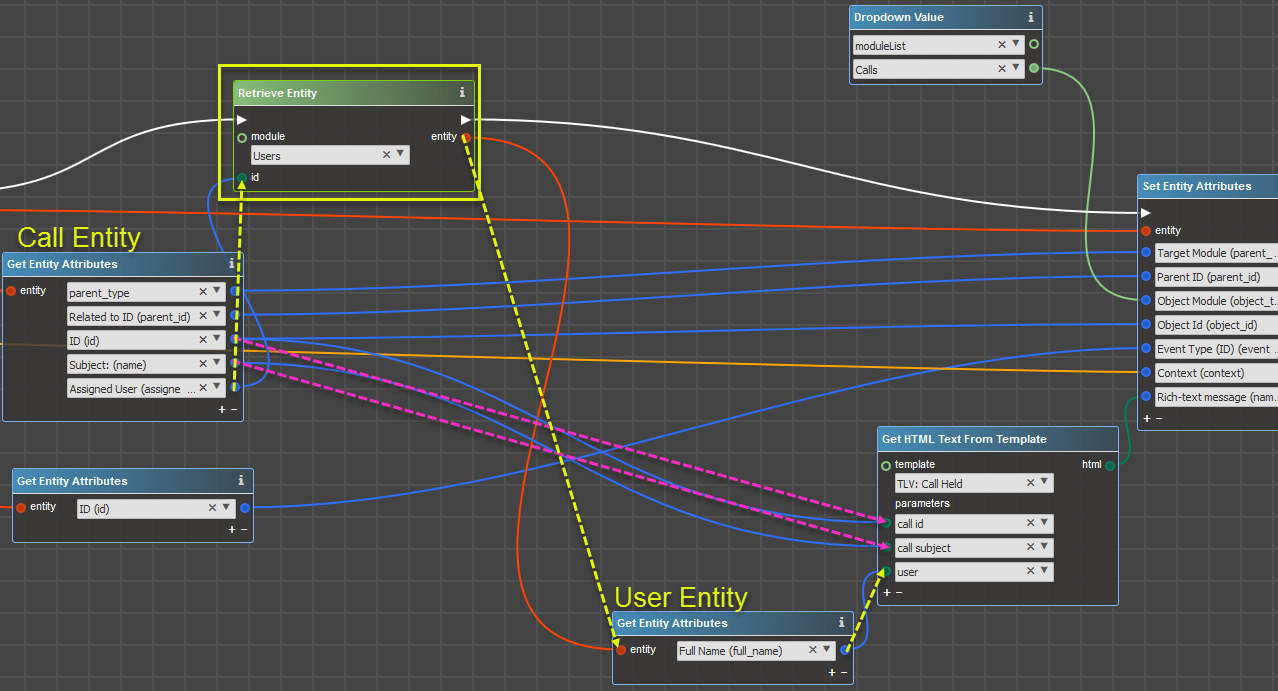
The final thing is to save a newly created Timeline.

Deploy changes on Sugar Instance
At last – generate and deploy package on Sugar instance as any usual package.
Once this task is completed – outbound and inbound held calls for Accounts, Contacts, Leads and Cases will be registered as an event on Timeline.