
 Author: Maksym Nesterenko, Software Engineer
Historically, web technologies have been designed to ensure close interaction between systems, services and their users. One of the most important and common tools of such interaction is data input. SugarCRM has plenty of such forms and that’s why they should be paid attention to. In this tutorial, we will show you how to customize SugarCRM to create a form. I would also like to note that the convenience of forms in various frameworks may be split into two components: the ease of use and the ease of creation. Therefore, a vendor releasing a product has to consider not only user-friendliness but also developer-friendliness of the system.
SugarCRM 7 allowed giving up quick repairs while creating custom forms in the previous version. Drawers, the technology of dropdown windows, introduced in Version 7, turned out to be a truly successful solution. With its help, we will try to create a SugarCRM custom form. Yet, to clarify the process of creation let’s start with a brief description of the task.
So, according to the task, you had to open a form for the input of data concerning the new user by pressing a button located in the page footer. After filling out the form, the data had to be included in an email and sent to the administrator / manager / supervisor. In addition, it was required that the data input should be validated, at least with an empty value. The task seemed pretty simple at first sight. Yet, provided that I came across it while I was only getting to know SugarCRM, it took me a lot of time to solve it. Nevertheless, I got a chance to delve into the features of SugarCRM structure instead. However, let us pass from the lyrics to the very solution of the issue.
So, the first thing we are going to do is to create an open form button. In this case, the button was positioned in the footer of the page (see. Figure Below).

To display the button, we should work with metadata a little, establish its display and explain to the system what we actually want to achieve:
1. We add a block with a button in the metadata of the footer. Copy the file from clients/base/layouts/footer/footer.php to custom/clients/base/layouts/footer/footer.php and determine our future view for the button (let’s call it new-user-actions):
1 2 3 | // custom/clients/base/layouts/footer/footer.php 'view' => 'new-user-actions' |
2. Now let’s take care of how this button will be displayed. For this end, let’s create a new template custom/clients/base/views/new-user-actions/new-user-actions.hbs containing the following:
1 2 3 4 5 6 | // custom/clients/base/views/new-user-action/new-user-action.hbs <button data-action="new_user_form" class="btn btn-invisible" aria-label="{{str "LBL_NEW_USER_FORM"}}" role="link"> <i class="icon-comment"></i> <span class="action-label"> {{str "LBL_NEW_USER_FORM"}}</span> </button> |
Not every customization requires code changes. We took several practical tasks that seemed to involve coding and solved them without programming. These automations are very popular among CRM users, and can save you a lot of time and effort.
If you look closely at the layout, you may notice that the most important element here is the attribute of button data-action=”new_user_form“. We will bind the display behavior with it.
3. The only thing left is to add a bit of logic. To do this, let’s create view CustomNewUserActionsView. In it, we will attach an On click button handler (we will need a useful data-action attribute to do this) and call out Drawer, to which we will transmit the layout of our form:
1 2 3 4 5 6 7 8 9 10 11 12 13 14 15 16 17 18 | // custom/clients/base/views/new-user-action/new-user-action.js events: { 'click [data-action=new_user_form]': 'showNewUserForm', }, ... showNewUserForm: function() { var activeDrawerLayout = app.drawer.getActiveDrawerLayout(); if (activeDrawerLayout.name !== 'new-user') { app.drawer.open({ layout: 'new-user' }); } }, ... |
The open form button is ready. Let’s move on to the form itself. First, we create a new-user layout and add the following code to it:
1 2 3 4 5 6 7 8 9 10 11 12 13 | // custom/clients/base/views/new-user/new-user.hbs $viewdefs['base']['layout']['new-user'] = array( 'type' => 'simple', 'components' => array( array( 'view' => 'new-user-form', 'context' => array( 'module' => 'SimpleForm' ) ) ) ); |
Recalling this issue, I would say that it was this very section of the code that I spent most of the time on. After re-reading the manual and forums, having tried various types of layout, the result was still unsatisfactory – the field of view CustomNewUserFormView would not load. As it turned out later, the key moment was in the declaration of the context or, more specifically, of the module to be transmitted in the context. Since it was not declared, module Home with its own model having completely different fields got into the context by default. To solve this problem, it was enough to transmit the text not relating to any module.
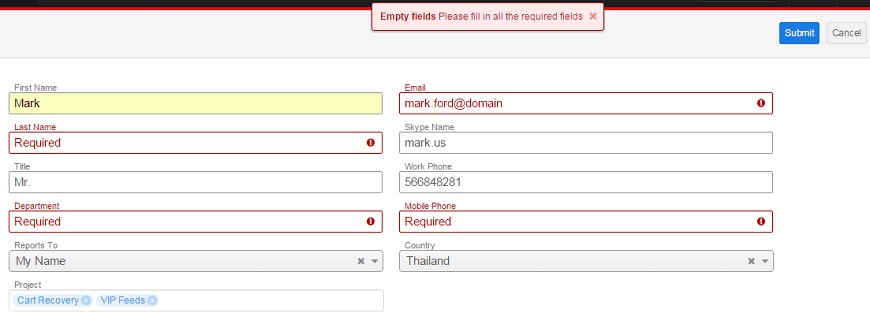
Let’s now turn to view CustomNewUserFormView. The first thing to do is collect metadata stored in file custom/clients/base/views/new-user-form/new-user-form.php. Let’s add buttons closing the form and sending an email. Briefly about the purpose of the buttons: The button closing the form (Cancel) hides a drop-down Drawer with the form, the button sending emails (Submit) launches the validation of the data input and, if successful, transmits the data to the server for further processing. Since the subject of this tutorial lies in the creation of a SugarCRM custom form, the manipulations with the data on the server will be simply omitted. And, of course, let’s add the required fields. I will present the section of the code from metadata file new-user-form below:
1 2 3 4 5 6 7 8 9 10 11 12 13 14 15 16 17 18 19 20 21 22 23 24 25 26 27 28 29 30 31 32 | // custom/clients/base/views/new-user-form/new-user-form.php $viewdefs['base']['view']['new-user-form'] = array( // Submit and Cancel buttons definition 'buttons' => array( array( 'name' => 'sendmail_button', 'type' => 'button', 'label' => 'LBL_SUBMIT', 'css_class' => 'btn btn-primary' ), array( 'name' => 'reset_button', 'type' => 'button', 'label' => 'LBL_CANCEL' ) ), // Fields definition 'panels' => array( array( 'name' => 'panel_content', 'labelsOnTop' => true, 'fields' => array( array( 'name' => 'first_name', 'label' => 'LBL_FIRST_NAME', 'type' => 'varchar', 'required' => true ), ... |
At the next step, we prepare the necessary html-markup for the form. As an example, template record.hbs was chosen. Of course, it had to be significantly amended by removing all unnecessary things. As a result, the template contained two main blocks: one – for the buttons, the other – for the fields. We won’t dwell on the template. I will only note that when working with HBS special attention must be paid to the level of metadata nesting. An extra level or a missing one will result in no information appearing in the output. The template should be placed in custom/clients/base/views/new-user-form/new-user-form.hbs. The only thing left is to establish a basis for the form – its view CustomNewUserFormView. After that, you will be able to see the result. And now it is high time we focused on the details.
As you may have already guessed, to create a view we need to design file new-user-form.js. However, before creating it, I suggest taking care of the possible expansion of the system. Suppose that after creating the SugarCRM custom form and making everyone happy, you receive a request to establish another form. You can just copy-paste a ready-made solution, replace the fields and titles, and you’re done. Nevertheless, we will have to re-register a model to work with the view, describe the validation of the same types of fields again, re-register the evaluator to close the dropdown window, etc. And it would be nice to design the fields in SugarCRM style in case an error occurred. And all this is only a minimal set of total functionality. Well, let’s take the opportunity to expand Backbone objects and create a view with total functionality. And only after that, we will inherit CustomNewUserFormView from it. So, let’s start.
First of all, connect the necessary plug-ins:
1 2 3 | // custom/clients/base/views/simple-form/simple-form.js plugins: ['ErrorDecoration', 'GridBuilder'], |
Now let’s prepare everything needed to initialize our form, namely, declare methods of registering a model and validating the email field:
1 2 3 4 5 6 7 8 9 10 11 12 13 14 15 16 17 18 19 20 | // custom/clients/base/views/simple-form/simple-form.js _declareModel: function(options) { var meta = options.meta || {}; var fields = {}; _.each(_.flatten(_.pluck(meta.panels, 'fields')), function(field) { fields[field.name] = field; }); app.data.declareModel(options.module, {fields: fields}); }, _doValidateEmail: function(fields, errors, callback) { var regexp = <your regular expession>; if (!regexp.test(this.model.get('email'))) { errors['email'] = errors['email'] || {}; errors['email'].email = true; } callback(null, fields, errors); }, |
In the initialization method initialize we call out registration of a model, add custom validation. Then we override the method doValidate. In it, we call out doValidate method of the model, in the callback of which we determine the steps to successful and unsuccessful validation. In the first case, we call out the method submit, otherwise – a system message about a failure to pass validation.
Let’s declare two other methods in the view:
- submit – by default returns to Boolean true;
- closeDrawer – closes an active Drawer by calling out app.drawer.close().
And now we can go back to CustomNewUserFormView although there’s not much work left to do. Basically, this view is responsible for transferring data to the server and for actions following the response from the server. So, to minimize the work, we determine callbacks for an event (in this case, a click on Submit and Cancel buttons). We must inherit from view CustomSimpleFormView and initialize the view.
1 2 3 4 5 6 7 8 9 10 11 12 13 14 15 16 17 18 19 20 21 22 23 24 25 26 27 | // custom/clients/base/views/new-user-form/new-user-form.js events: { 'click [name="sendmail_button"]': 'sendMail', 'click [name="reset_button"]': 'closeDrawer' }, // Extends user form view from CustomSimpleForm extendsFrom: 'CustomSimpleFormView', // Initialize initialize: function(options) { this._super('initialize', [options]); }, // Prepare form data and call server api submit: function() { } // Send mail sendMail: function() { this.doValidate(); } ... |
As you can see, using SugarCRM customization for the creation of a form is a fairly simple process. Given the fact that it was possible to dispense with the creation of the parent view, things are getting even simpler. Of course, you can modify anything you want: add your own fields, play with the appearance, for example, add a title for the form, improve parent view CustomSimpleFormView by adding its own validation methods, etc. And, of course, preparation and sending of data to the server solely depends on the requirements of your task and your vision on its realization.
The result of SugarCRM custom form creation will look similar to the following:
Conclusion
The tutorial explains how to use SugarCRM customization in order to create a custom form that is easy and convenient in use. Our customization turned out to be pretty simple and, more importantly, had enough room for personal modifications.
Have a question about SugarCRM customization? Ask us!
Other SugarCRM customization tutorials: